
With 2020 we are going to look at a new aspect of programming: data structures. It is often the case that everyone uses structures provided by the various programming languages. The objective will be to have a general idea of how they work and their internal mechanisms. Often we will give a version not quite the same as the one actually implemented, but in the end we will still have an overview of how the structure works.
In particular, today we are going to deal with a rather difficult topic for many people: Linked Lists.
Let's take a closer look.
A Linked List is composed of nodes. A node is the set of data it must represent and the pointer to its next. This means that each node will have a field containing the address of the next element in the list.
Let's have a look to a picture:
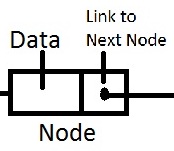
Let's see how the node is composed of a generic data field that represents all the information it should contain and a next field, which represents the pointer to the next node.
Why do we need the field next?
The idea is not to need a contiguous space in RAM, so you choose to allocate a number n of nodes where there is space available. We therefore obtain the advantage of a dynamic structure also from the point of view of memory occupation.
Implementation of the Node class
In this implementation we assume that the node information is a whole number. It can easily be replaced with more complex data types.
public class Node {
int data;
Node next;
//Constructor to create a new node
        // Initialize next to null by default
Node(int data) {
          this.data = data;
          this.next=null;
        }
}
The class is very simple in its implementation, in fact it has only one constructor that only initializes the data field and sets the next default field to null. For completeness, I preferred to make the initialization of the next one explicit.
LinkedList class
Let's go and see some operations that we can perform on the linked lists.
Creation, insertion and printing
import java.io.*;
// Java program to implement
// a Singly Linked List
public class LinkedList {
private Node head; // head of the list
// method to insert a new node
    // returns a new list
public static LinkedList insert(LinkedList list, int data)
{
// create a new node with the data given
Node toInsert = new Node(data);
// if the list is empty,
// the new node becomes the head
if (head == null) {
head = toInsert;
}
else {
 // Otherwise scrolls the list down to the last node
            // and insert the new node there
Node last = head;
while (last.next != null) {
last = last.next;
}
// insert the new node as the last
last.next = toInsert;
}
// Returns the new list by returning the pointer to the head
return list;
}
// method to print a list
public static void printList(LinkedList list)
{
Node curr = head;
// Browse the concatenated list
while (curr != null) {
// print the data contained by the current node
System.out.print(curr.data + " ");
// passes to the next node
curr = curr.next;
}
}
public static void main(String[] args)
{
/* begin with an empty list */
LinkedList list = new LinkedList();
// insert values
list = insert(list, 11);
list = insert(list, 21);
list = insert(list, 31);
list = insert(list, 41);
list = insert(list, 51);
list = insert(list, 61);
list = insert(list, 71);
list = insert(list, 81);
// print the list
printList(list);
}
}
Let's understand better what happens. The insert method shown above performs what we call queued insertion, making the node to be inserted the last one.
We can distinguish two cases: the empty list and the non-empty list.
In the case of an empty list, the node to be inserted becomes the head of the list, as well as the only node in the collection.
In the case of a non-empty list, you scroll the list until you find the last node. Then the next field of the last node is set with the address of the node to be inserted. In this way we will get a new list whose last node is the node we want to insert.
As far as printing is concerned, we'll just do a cycle that iterates until the elements to be printed are finished. At each iteration, we print the data field of the node being examined.
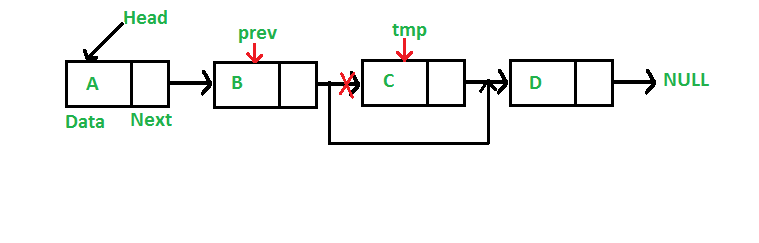
Let's see a drawing.
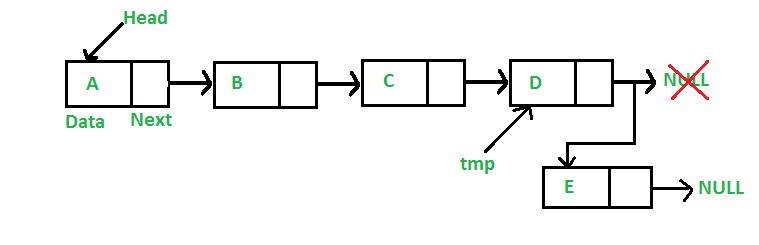
Deletion by key
The idea is that, given the data to be removed from the list, we delete the first occurrence we find. We will follow the following steps:
- We search for the occurrence of the element;
- If I find the item, I have three cases:
- The found item is the head of the list, so you update the head pointer and let the garbage collector take care of the node you can't reach;
- The found item is inside the list or at the end, so you will have to search for the previous item if found and update its next pointer.
- If I don't find the item, I do nothing.
Let's see the code:
publicstaticLinkedList deleteByKey(LinkedList list,intkey){Node currNode = list.head, prev =null;/*CASE 1: the node to delete is the head of the list update the pointer.*/if(currNode !=null&& currNode.data == key) {list.head = currNode.next;// update the pointer to the head// Return the updated Listreturnlist;}/*CASE 2: the element is womewhere else*/// I am looking for the data to delete, // keeping track of the previous node // and when necessary, change currNode.nextwhile(currNode !=null&& currNode.data != key) {// if currNode does not contain the data // move on to the next nodeprev = currNode;currNode = currNode.next;}// If the key is present, you should find it in currNode // So currNode should not be null and voidif(currNode !=null) {// Since the data is contained in currNode // I detach it from the listprev.next = currNode.next;}// CASE 3: the key is not present // If the key is not present, currNode is nullif(currNode ==null) {System.out.println(key +" not found");}// returns the listreturnlist;}
Some deletion variants may result in deletion at the top, deletion in the queue or deletion at a certain position.
Let's see with a drawing.
Conclusions
We have briefly seen how a concatenated list can work. We note that the implementation provided is that of the Java language, but it could easily be converted to other languages that provide adequate mechanisms. Knowing the logic of how these structures work can be very useful when we have to do some rather complicated debugging.
We will see later on an implementation that works the same way, but with different characteristics, since here we take for granted the presence of the null element. We will see an implementation where a specific class will represent the null node.
Java provides specific classes that implement the mechanisms of a concatenated list. We'll see some examples later.
In essence, this is one of those cases where theory comes to our rescue.