JWT tokens are a standard used to create application access tokens, enabling user authentication in web applications. Specifically, it follows the RFC 7519 standard.
What is a JWT token
A JWT token is a token that gives the user access to an application by certifying their identity. This token is returned to the client, which is usually the user's browser, sending the token back to the server with each successive request. In this way, the server knows whether or not the request comes from a specific user.
This type of design is very common when we have a frontend application that accesses the server through a REST API or GraphQL. The user will authenticate by sending their access data to the server and the server will create and return a JWT token if the access data is correct. It is important not to confuse authentication with authorisation, as they are two different processes. The token will be stored in the user's browser, for which a cookie is often used.
When using a JWT token you will need to use a secure HTTPS connection. This is because the tokens are not encrypted, they are simply cryptographically signed by the server. In theory, using a secure connection, no user will be able to intercept or modify the token as it travels from its source to its destination and vice versa.
How to generate a JWT token
The method used to generate a JWT token varies depending on the programming language and the functions or libraries used for this purpose. Below we will see how to generate a JWT token with both JavaScript and PHP.
JWT token with JavaScript
Let's see how to generate a JWT token with Node.js. The only thing you will need is to have Node.js installed on your system and initialize any project.
Then you must use the following code, where you must create a JSON object in which the HMAC SHA256 algorithm is set as the encryption algorithm, although you could use any other that is supported. Then we generate a Buffer from the object and encode it as a base64 string:
const header = { "alg": "HS256", "typ": "JWT" };
const codedHeader = Buffer.from(JSON.stringify(header)).toString('base64');
You must then add the user's data, whatever elements identify the user. This could be the user's system user name or identifier. You can add as much data as you consider necessary. The only exception to the elements of the object containing the data are the iss and exp keys, which are keywords that you will not be able to add and that serve to establish the issuer of the token and its expiry date.
We will also have to convert the object into a Buffer and encode it as a base64 string. Below you can see an example:
const data = { id: 'id_user' };
const codedData = Buffer.from(JSON.stringify(data)).toString('base64');
Next, we are going to import the crypto module from Node.js and set up a secret key to sign the token. You can use any other library to do this. Then we will generate the signature from the header codedHeader and the user data data codedData. We will use the signature and the secret key to generate a base64 representation of the encrypted signature.
const crypto = require('crypto');
const secretKey = 'secret_key';
const signature = crypto.createHmac('sha256', secretKey).update(codedHeader + '.' + codedData).digest('base64');
This prevents the content from being modified, as this would invalidate the signature.
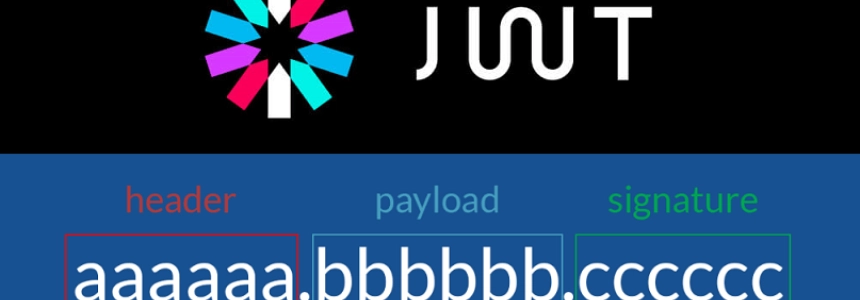
Now we only need to concatenate the encoded header, the encoded data and the signature to generate the JWT token. For this we use a template literal. The different elements will be separated by a dot:
const tokenJWT = `${codedHeader}.${codedData}.${firma}`;
JWT token with PHP
Let's see how to create a JWT authentication token with PHP. For this we could use an existing package or create the token from scratch. Let's look at both cases.
To create the token manually, we first have to create the JSON object that will contain the token header, setting the HMAC SHA256 algorithm as the encryption algorithm, although you could use any other that is supported. The use of typ and alg names is part of the standard. We will then encode the object as a base64 string:
$header = json_encode(['typ' => 'JWT', 'alg' => 'HS256']);
$codedHeader = str_replace(['+', '/', '='], ['-', '_', ''], base64_encode($header));
Then we will have to add the user's identification data in a JSON object, being able to add any key except the reserved words iss and exp, used to establish the token issuer and expiry date respectively. We will also have to generate a string in base64 format:
$data = json_encode(['id' => 'user_id']); $CodedData = Buffer.from(JSON.stringify(data)).toString('base64');
Next we must create the signature, encrypting the header, the data and the secret key with the sha256 algorithm, for which we will use the PHP hash_hmac function. In addition, we must also encode the signature as a base64 string:
$secretKey = 'secret_key';
$signature = hash_hmac('sha256', $CodedHeader. '.' . $codedData, $secretKey, true);
$codedSignature = str_replace(['+', '/', '='], ['-', '_', ''], base64_encode($firma));
Finally, we will create the JWT token by joining the encrypted header, the encrypted data and the encrypted and encrypted signature:
$tokenJWT = $codedHeader . '.' . $codedData . '.' . $codedSignature;
With this we would have already created the JWT token, although there are other faster methods by which we can also generate the token.
For example, we can use one of the many packages that facilitate the creation of JWT tokens. In particular, we can use the ReallySimpleJWT library, which you can install via composer:
composer require rbdwllr/reallysimplejwt
To create a JWT token in the simplest way, we simply use the create method of the ReallySimpleJWTToken class, which we will use to create the token.
This method receives as parameters the user's identifier, which can be their email, their username or any other data that identifies them. As a second parameter it accepts a secret key that we will have to configure and, as a third and fourth parameter it accepts the expiry date of the token and the issuer of the token respectively, these last two parameters being optional:
use ReallySimpleJWTToken;
$idUser = 'id_user';
$secretKey = 'secret_key';
$expiration = time() + 3600;
$emitter = 'localhost';
$tokenJWT = Token::create($idUer, $secretKey, $expiration, $emitter);
We could also add additional custom data in addition to the user ID using the customPayload method:
use ReallySimpleJWTToken;
$data = [
    'uid' => 'id_user',
    'iat' => time(),
    'exp' => time() + 3600,
    'iss' => 'localhost'  ];
$secretKey = 'secret_key';
$token = Token::customPayload($data, $secretKey);
To validate the token when it is returned by the client, we can use the validate method:
use ReallySimpleJWTToken;
$result = Token::validate($token, $secretKey);
API Authentication with a JWT token
Once you have generated a JWT token, you can store it in an HttpOnly cookie, which is the most secure way to avoid XSS attacks. This is because JavaScript will not be able to access this cookie, being automatically sent to the server with each request. The process to be performed is as follows:
- First the user will send his access data to the server.
- The server will generate the JWT token based on this data and store it in a cookie.
- In subsequent requests, the client will send the JWT token to the server, thus being able to identify itself.
Finally, in case you want to store session data, it is strongly recommended that you use the server sessions of a lifetime.