
This article goes out to all the computer nerds who are, when it comes to networking, more on the noob-side of the crowd. It does not have to be complicated and everyone with patience and eagerness to learn something new can relatively quickly gain the knowledge necessary to feel more confident when it comes to this topic. In this article, we would like to focus on a tool which is of great use to those who are already experienced professionals as well as for beginners who would like to see what there is to it. In fact, we might say that it is indispensable for everyone wanting to dive into the world of network exploration and security auditing.
This tool is Nmap (a.k.a Network Mapper) or better said Zenmap – which is the graphical user interface for Nmap. It’s completely free to download, multi-platform and best of all, supported by a very comprehensive and information-laden website.
When it comes to Nmap you need to work with the command line, meaning you need to use rather cryptic-looking commands with complicated options and parameter sequence... and this is not for everyone. Here comes Zenmap to the rescue. With Zenmap, network scanning is greatly simplified and more accessible even for beginners. Zenmap is in fact making Nmap even more useful by adding some interesting features:
- view results in a graphical and interactive way, including the option to draw a topology map of discovered networks;
- graphical comparison between different scans – you can use Zenmap to graphically show the differences between two scans. This can help you to track new hosts or services appearing on their networks, or existing ones going down;
- save scans under command profiles and use them according to your need;
- user-friendly – especially useful for users not too experienced with shell commands;
What does nmap / zenmap actually do?
It’s main use is to monitor ports on computers on the network. It tries to discover security holes and / or wrong configurations by using scripts and extensions. This means Nmap is a comprehensive network analysis tool NOT ONLY for system and network administrators but for everyone curious to learn more about their network environment and it’s security and maybe, just maybe try and look for security vulnerabilities. I am not saying “hacking” (but hacking!).
Where do I start? Installing nmap & zenmap
First, you need to install nmap on your system. Since it’s multi-platform, you should not have any problem with following the corresponding installation instructions. Zenmap is usually packaged with Nmap. TIP: Nmap packages are already included on many Linux distros, so first you can try and check entering nmap --version in your terminal, if you get an output with the version number, your system already has a copy of nmap, although you surely should upgrade to the latest version before use.
If you’re working with a Windows machine, no worries. Even though nmap was originally unix-only, after it’s Windows version came out back in 2000, it has become the second most popular nmap platform. (First being Linux of course.) So thanks to it’s popularity, binary executable for Windows users are available with each new nmap release. So, after you download the installer from this link, unpack and install, you should find a new Zenmap icon on your desktop. In case you get stuck, a more detailed manual can be found at the official nmap site.
After a successful installation, let’s get started by scanning our own IP address.
First steps into port scanning - how & why should I scan my own IP?
Our first steps in getting to know how network mapping works should be with scanning our own IP, so that we can assess the state of security of our system. We can see which ports are opened and what services are running. Port scanning is, after all, at the core of what nmap does.
An open port means that there is an application listening on that port. Potential attackers will try to execute an exploit that application. As a system administrator you want to scan it for vulnerabilities.
It’s really simple, you paste your IP into the “Target” field in the upper left corner and then select a scan profile from the drop down list on the right.
You can choose from scans of varying scope, for example:
• intense scan (with or without UDP)
• quick scan for the most common TCP ports
• ping scan – to confirm really fast if a host is available
• regular scan
All of those profiles can be modified and saved as a new profile if you so desire.
Depending on how complicated the scan is, the results may take anywhere between a few seconds up to even as long as half an hour to appear. A good thing is, the scan profiles can be saved for later use, and also the results are maintained for a certain amount of time.
Interesting to note is that you don’t need to wait for one scan to finish before starting another, because several scans may run at the same time. After a scan finishes, you can view the results it the “Scans” tab. (TIP: It’s possible to save the scans you have performed in XML format.)
After choosing a scan profile, you can observe that the corresponding command appears in the command box. This is the command line equivalent of the scan you are about to run.
After successfully running the scan, you should get a list of ports with states assigned to them. You can see them neatly organized after clicking on the “Ports/Hosts” tab.
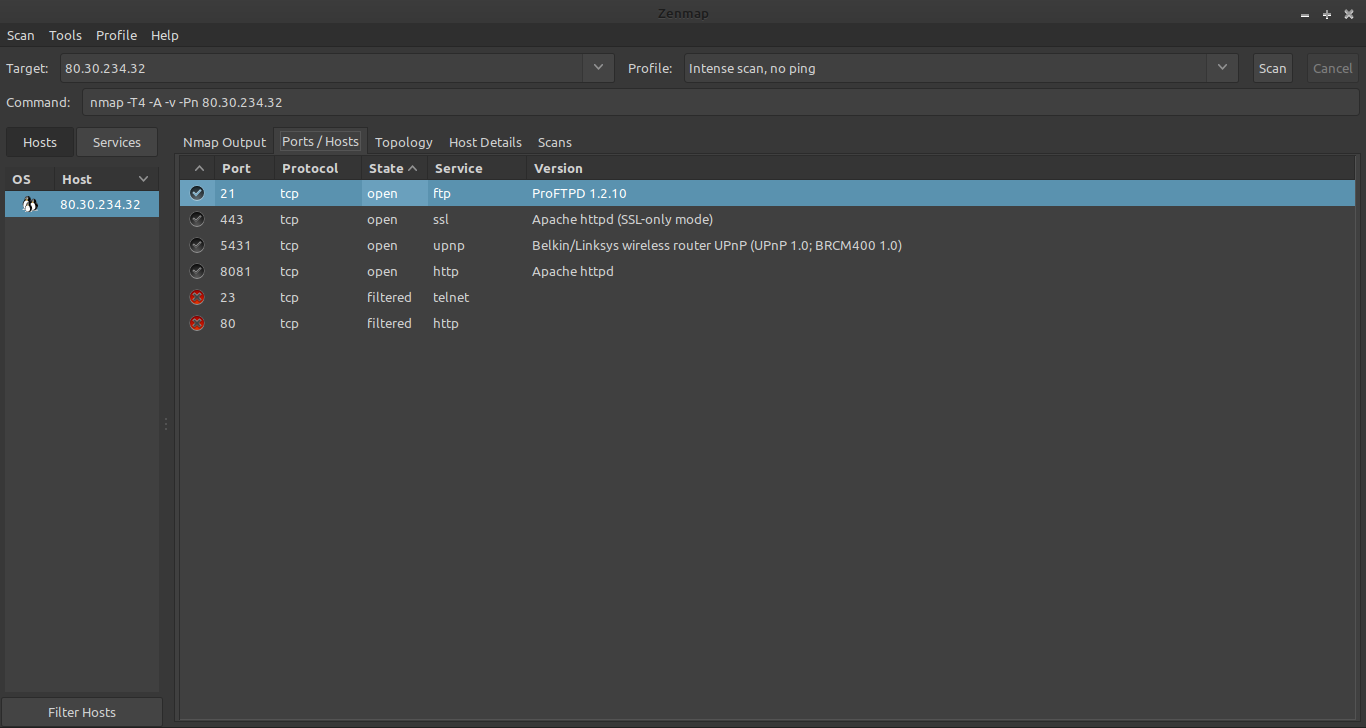
Understanding port statuses
As opposed to a simple port scanner, which will divide all ports into two or three states (open, closed, filtered), Nmap goes into more detail and distinguishes between a total of six port states (open, closed, filtered, unfiltered , open|filtered and closed|filtered).
If you want to use Nmap for port scanning effectively, you should be familiar with these port states and know what each state means and how to interpret it.
For beginners it is sufficient to know that:
1. open - this state means that an application or service is ready to accept TCP connections or UDP packets on that port. Having open ports is required to be able to establish and manage connections. However, they also represent a potential security danger, because hackers are on the lookout for them, and may try to misuse them. Therefore, the responsible thing to do is to try and limit the number of opened ports and also additionally protect the opened ports, restricting the connection possibilities. You can use a packet filter so that connection attempts are rejected.
2. closed - this state means that no application or service on this port is listening neither for incoming data nor for connection attempts, meaning it is practically unused. To ensure that ports cannot be used accidentally, system administrators usually block ports with a firewall (port filter).
However, a tool like Nmap is able to bypass the filter and check if the port is actually closed.
3. filtered (blocked) – this means that the system administrator has used a port filter on this port, to protect it. Port filters are used on open as well as closed ports. These filters can prevent connection attempts by port scans. Since a port scan only determines the state of a port, but is not supposed to establish a real connection because it does not know the underlying application, it can only send test packets to a port. The filter prevents these test packets from getting through. In this case the port scanner does not get an answer. Then neither the status "open" nor "closed" can apply to this port.
The filter used can be a classic firewall, a router rule or a host-based firewall software. This allows many automated port scans to be kept away from the system.
Filtered ports are a great way to keep hackers away, because they slow down the port scanning significantly. Since the scanner does not receive an answer from a filtered port, it has to repeat the scan more times to confirm this was not caused by a loss of packets while sending the petition. Also, it has to wait out the timeout period until it can assume the “filtered” state. For this reason Nmap uses different methods to check whether the target system is basically reachable before a port scan. Only then a port scan is performed, where a non-responding port can be assumed to be "filtered".
Wrapping up
So, today we got to know the network analysis tool Nmap or better said, it’s GUI Zenmap. We scanned our own IP address and learned the state of our ports. This knowledge helps us to better understand where our vulnerabilities lie and what to do in order to protect our system.
Image by VIN JD from Pixabay