When I started browsing different and original websites to learn from them, one of the first things that caught my attention was that some of them had their own cursors, so I investigated how to incorporate it into my website.
Today I bring you a simple version of a custom cursor so that you can use it as a base and so that you can begin to play until you get to have the cursor you want.
The html is very simple, it is a simple div with the class you want to put in my case will be "cursor" and I have added a list to have something and see how the cursor interacts.
- Enlace 1
- Enlace 2
- Enlace 3
- Enlace 4
After having the html we have to add the css of our cursor, it is a simple black circle with absolute position, I have added a transition to him for when we add interactions to him it is seen with a small short transition.
.cursor {
            width: 2rem;
            height: 2rem;
            border: solid 2px #000000;
            border-radius: 50%;
            position: absolute;
            transform: translate(-50%, -50%);
            pointer-events: none;
            transition: all ease 0.1s;
        }
Now that we have the css we go with the javascript so that we can use that circle like cursor, we make a variable with the div of the cursor and I have made another with the li that I will use them as if they were links.
To the cursor we put a function to move that calculates the horizontal and vertical position of the cursor and applies it to the div that we have created positioning it, that is why it is important that had absolute position, if you look at the css also had a translate, what makes this translate is that the position of the cursor is in the center of the div that we have created, if we did not put it would be at the top left, you can try it if you want and if you do not want it in the center position it as you want.
let raton = document.querySelector(".cursor");
let enlaces = document.querySelectorAll("li");
window.addEventListener("mousemove", moveCursor);
function moveCursor(e) {
    raton.style.top = e.pageY + "px";
    raton.style.left = e.pageX + "px";
}
Once we check that our cursor is working and is right where the default cursor is, we would have to remove the cursor that is by default, it is very simple, simply remove the cursor throughout the web, it's that easy.
*{
    cursor: none;
}
And finally we are going to add the effect of click and hover. I have made a class in css of how I want the cursor to be when I click or pass over an element that can be clicked.
.cursor-click {
    width: 1rem;
    height: 1rem;
    border: solid 3px #27e6bc;
    background-color: hsla(167, 79%, 53%, 0.4);
}
.cursor-hover {
    border: solid 3px #27e6bc;
}
I have also applied css to the li and a hover to see how everything interacts as a whole.
li {
    font-size: 3rem;
    list-style: none;
    margin: 3rem;
    text-align: center;
}
li:hover {
    color: rgb(187, 255, 0);
}
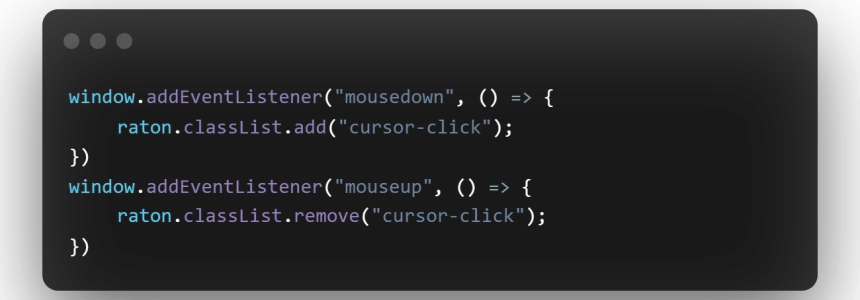
First let's see the click effect, just add two simple functions, adding the click class on click and removing it when the mouse is released.
window.addEventListener("mousedown", () => {
    raton.classList.add("cursor-click");
});
window.addEventListener("mouseup", () => {
    raton.classList.remove("cursor-click");
});
Now we will add the hover to the li elements, you can add it to whatever you want, but if there are going to be many different elements I recommend you to make a class and add it to all the elements that you want to interact in this way with the cursor.
Simply we make a for each with all the elements and we add the 2 functions as before, one of over to add the class when being on top of the element, and another of out to remove that class when leaving that element.
enlaces.forEach(function (element) {
    element.addEventListener("mouseover", function () {
        raton.classList.add("cursor-hover");
    });
    element.addEventListener("mouseout", function () {
        raton.classList.remove("cursor-hover");
    });
});
And we would already have the basics for our cursor to work, now it's time to try to make it more personal or to your style and try different things like adding a svg, put elements inside the cursor div and apply some filter, but from here it's up to your imagination.
I give you a link with the example and the code Here so it will be easier for you to start trying to customize your cursor.