There has always been a belief that the Apple MacOS Operating System could only be installed on computers sold directly by Apple. But on the Internet there is a large community dedicated to Hackintosh. And in this guide we are going to show you today all you need to know about it, while we make an installation of a compatible system.
For those who don't want a Mac but do have an operating system, we will show you how to install MacOS Catalina 10.15 on any PC (as long as the hardware allows it). In this guide on how to make a hackintosh we will guide you step by step through the installation of Catalina, from beginning to end. This means that with the configuration that we will carry out we will be able to start up a MacOS installer that should work on most new desktop and laptop computers.
What is Vanilla Hackintosh?
There are three popular ways to install MacOS on non-APPLE hardware. The first is to use a universal installer to install a "modified" version of macOS (e.g. Multibeast/Unibeast, etc.), this is the easiest way to build a beginner's hackintosh as the installer does most of the work for you. The second is from a mac distro. And another one is the "Vanilla" installation with which you will have to prepare all the kext (Kernel Extensions) and the configuration file from scratch. Then you will place them in a separate EFI partition, leaving the main MacOS partition intact and identical to a real Mac.
Why the Vanilla method?
Multibest/Unibest is a method of modifying the "kexts" macOS within (/system/library/extensions) along with some other modifications. This works well most of the time but there are some cons like:
- Updating macOS could break or remove your hackintosh settings
- If the OS partition is tampered with, you can 'not use it to boot up with a real Mac or any other vanilla hackintosh
- Limited options for solving your Mac's problems since everything has been done by Multibeast. When something breaks, you have no idea where to start looking.
- Limited options for single/supported hardware (e.g. Ryzen-Hackintosh)
- You will miss the opportunity to learn about the start-up process, EFI, Clover, how to configure VirtualSMC, SMBIOS, etc.
A vanilla hackintosh will not have this problem because all keys and settings are placed on the EFI (Extensible Firmware Interface) partition which is separate from the operating system partition. At boot time, these keys and information will be injected into the macOS installation to make it look like it is running on the Apple hardware. In this way, you will get an identical (or almost identical) experience as if it were a real Mac.
How does a Hackintosh start up work?
When you turn on a real Mac, a System Management Controller ("SMC") chip sends information about all your hardware to the MacOS. This is to ensure that the operating system is running on a genuine Apple machine and also to provide the hardware configuration. Since a hackintosh does not have SMC, we will have to fake it. And here comes one of the key and mandatory kext for all hackintosh - "FakeSMC"
After validation of the SMC, the operating system will start loading the drivers. This is when we will inject our manually selected kexts files into the OS. If your hackintosh has Apple compatible hardware, you will only need a few kexts. For example, Intel Core series processors, AMD RX graphics cards and Broadcom Wifi card are known to be natively supported by macOS and do not require any additional kext to work. On the other hand, AMD Ryzen processors, Nvidia cards and Realtek Wifi cards are much more difficult to configure and require several kext to work.
The original macOS kexts reside in the /system/library/extensions operating system partition. But the vanilla method will place all the extra kexts in the EFI partition and inject them during the boot instead. This is the main difference between the multibeast/Unibeast method and the vanilla method. Leaving the operating system partition intact, we can use this partition to boot up with any Mac or other vanilla hackintosh. Also all the kexts, the boot argument and the device configuration will be in the same place, so you will know where to fix when something goes wrong. And with the right selection of the kexts and a good boot configuration, your hackintosh will work like a real Mac.
First step - Get a copy of Catalina macOS
To start configuring a Hackintosh we will first need a copy of Catalina, which we can get by downloading it from the App Store
Catalina can only be downloaded from the macOS App Store on a computer with macOS either from a Mac, virtual machine or a hackitosh.
Step 2 - Create an installation pendrive
Now that we have a copy of MacOS Catalina the next step is to turn it into a usb installer. This is done by first making a GUID formatted pendrive, using Terminal to move the installer image to the flash drive and then editing the EFI Partition hidden in the flash drive to contain the EFI Folder needed to boot the macOS on non-Mac hardware. How to make a Catalina flash drive installer for macOS 10.15
Step 1
- Introduce a Flash Drive of at least 8GB
- Open the disc utility
- Select your pendrive in the left column
- Click on delete
- And format it with these options:
- Name: HackintoshUSB
- Format: Mac OS Plus (With Registration)
- Schedule: GUID
NOTE
You will need to disable System Integration Protection (SIP) on your Mac before you can run the Clover EFI Installer. To disable SIP, restart your Mac and boot into recovery mode by holding R-Command until you see an Apple icon with a progress bar. Then open a terminal in the menu bar and type the following command.
csrutil disable
Reboot your Mac again to check the SIP status using
csrutil status
Step - 2 Create the USB Bootable
After downloading the Catalina Installer from the Mac Appstore it will be ready to be installed on the USB drive using the Terminal.
- Catalina installer is in the /Applications
- folder
- Open the terminal through launchpad or spotlight ( CMD ⌘ + space)
- Paste the following into the terminal by entering your password if you are asked for it:
sudo /Applications/Install macOS Catalina.app/Contents/Resources/createinstallmedia
--volume /Volumes/HackintoshUSB /Applications/Install macOS Catalina.app --nointeraction
- Do not close the terminal until it is finished, the installer will transfer slowly and it may take some time, especially if you are using USB 2.0 .
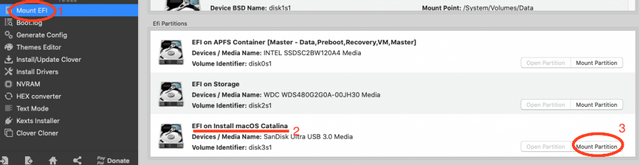
Once the process is finished, we will proceed to mount the EFI partition that is hidden in our installation usb.
Download Clover Bootloader and run the Clover EFI installer. Follow the instructions on the screen and select our USB drive as the destination.

Then click on the customisation button and select the next option. This is to install the Clover boot loader and the UEFI driver to help our Clover load the MacOS. Then follow the instructions on the screen.
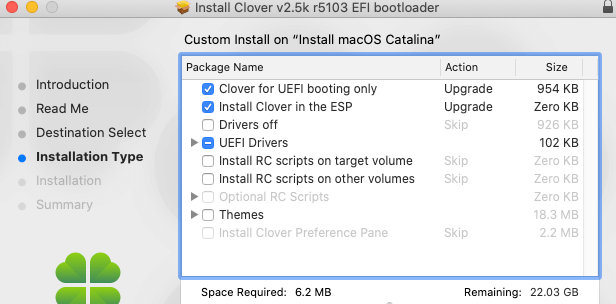
Once Clover is installed, a new EFI partition will be created on your USB. This is where we will work later.
Now this Pendrive will "almost" be able to boot up on the PC. The next step is to set the boot parameters and prepare the kexts files.
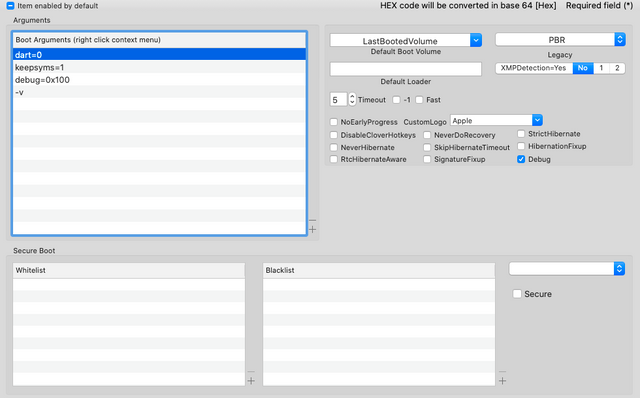
Startup configuration
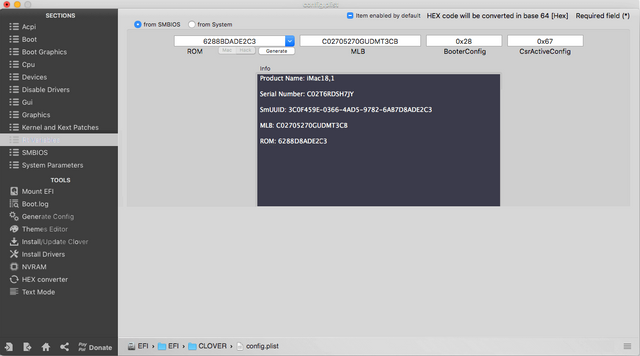
When Clover is booting up the MacOS, it will look at a system configuration file called "config.plist". This file contains vital system information that your hackintosh will need to be able to boot (e.g., the serial number of the "dummy" device, SMBIOS, firmware fixes, and boot parameters). You can use any plain text editor to configure it. However, there is a much easier way. You can download the Clover Configurator tool from here (Clover Configurator is not associated with the Clover boot loader despite the name).
config.plist should be automatically created and placed on your EFI partition in the /EFI/Clover/ folder. To navigate the EFI partition, you will need to first mount it through Clover Configurator (or through a terminal command if you prefer the hard way).
Now, once you open the config.plist with Clover Configurator, you can start customizing the settings. Unfortunately, there is no universal solution. You will need to spend some time researching what configuration you need to "build" for your computer. Here is a very good explanation of which option you will need for a specific hardware. I will also provide my config.plist below for your reference. .
ACPI
Advance Configuration and Power Interface o ACPI. Aquí es donde puede remapear/modificar cierta definición de hardware en la Tabla de Descripción Diferenciada del Sistema (DSDT). Por ejemplo, puede cambiar SAT0 a SATA para una mejor compatibilidad de los dispositivos SATA.
Boot
You can configure your hackintosh boot through "boot arguments" like booting mac in verbose(-v) mode to display the boot log instead of the Apple logo, enable debug mode (debug=0x100) to avoid kernel panic when there is a problem (causing a boot loop) or choose a default boot drive.
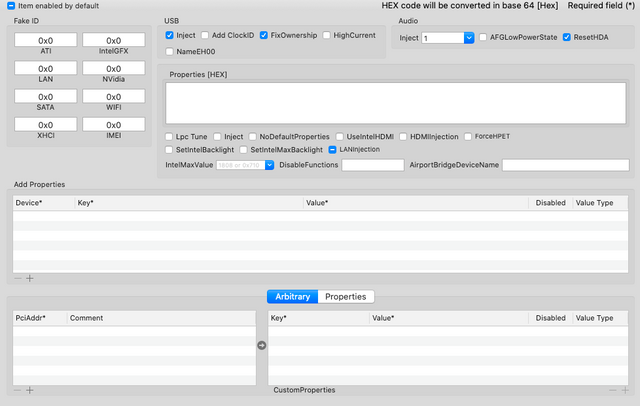
Devices
You can troubleshoot device compatibility issues such as USB, audio and unsupported GPUs on this tab
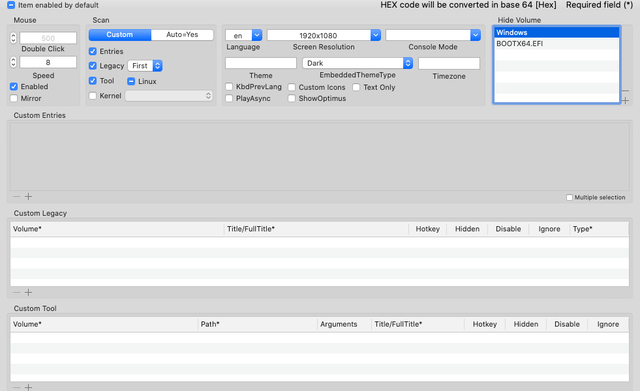
GUI
You can customize the Clover start menu, such as changing the resolution, theme and custom icons. If you choose a theme that does not exist, Clover will return to an alternative, ugly, low-resolution start menu.
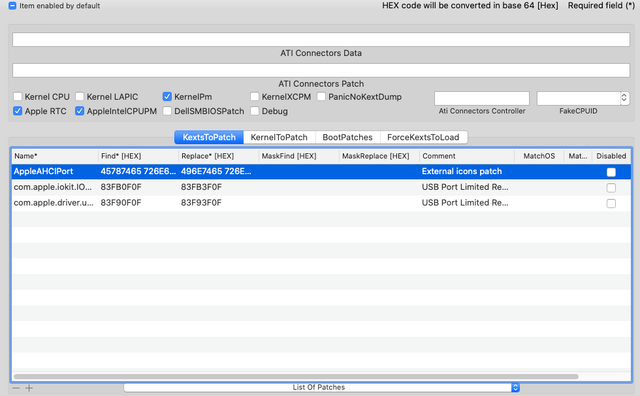
Kernel and Kexts
You can apply Kexts here. For example, apply kexts to extend the USB port limit (Mac has a USB port limit of 15, which is not enough, as USB 3.0 will be counted as 2 ports)
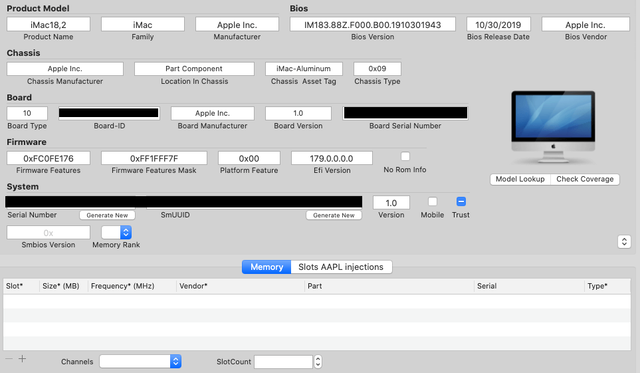
Rt Variables/SMBIOS/System Parameters
This is all about your hackintosh information. You can change the Mac model, BIOS version, board and machine serial number, etc. Use the values of the Mac model that is closest to your hackintosh. For me, it's the iMac 18.2. Also, don't forget to check if the serial number generated is already in use by using the "Check coverage" button.
Now the config.plist file is ready. The next step is to prepare the kext.
Preparing the Kext
As I mentioned earlier. Kext is like a driver. So the more supported hardware you have, the less kext you will need. Here is the list of the most popular kexts that are often used.
FakeSMC - It is a kext more than compulsory to forge the SMC chip as I said before.
USBInjectAll.kext - It is a mandatory kext for your USB ports to work. You will also have to download the XHCI-unsupported.kext to enable USB 3.0 speed.
AppleALC.kext - Allow audio in your hackintosh. You can check the supported audio chips here. (Require Lilu.kext to work)
HDMIAudio.kext - If you use a monitor with built-in speakers via HDMI, you will need this kext.
FAKEPCIID.kext - Emulates CPU identification for CPUs not supported as Pentium processors You will also need NullCPUPowerManagement.kext.
FakePCIID_Intel_HD_Graphics.kext - iGPU ID emulation without support
IntelMausiEthernet.kext, RealtekRTL8111.kext,AtherosE2200Ethernet.kext - Enable the ethernet port for the Intel, Realtek, Atheros chipset (just choose one depending on your network card chipset)
After downloading all the kext, you will have to move them to your EFI partition of the usb installer that we had previously mounted on EFI/Clover/kexts/other. All kexts in this folder will be injected during the boot regardless of the MacOS version. You can also put the kexts in a specific folder to inject the kexts for a specific OS version (e.g. 10.13, 10.14 etc.) but personally I would prefer to put all the kexts in one place to avoid confusion.
Now the kexts and config.plist are well configured, our MacOS Installer is ready!
BIOS configuration
You will also need to change your BIOS settings to be compatible with macOS.
- Disables VT-d CPU
- Deactivate Secure Boot
- Enables XHCI Handoff
- Change OS Type to Other (If your BIOS has this option)
- Disable Fast boot mode
- Disable CSM Support (If your BIOS has this option)
- Disable CSM Support (If your BIOS has this option)
- Change the SATA Mode selection to AHCI
and finally change the boot order priority to boot from the installation USB
Install macOS
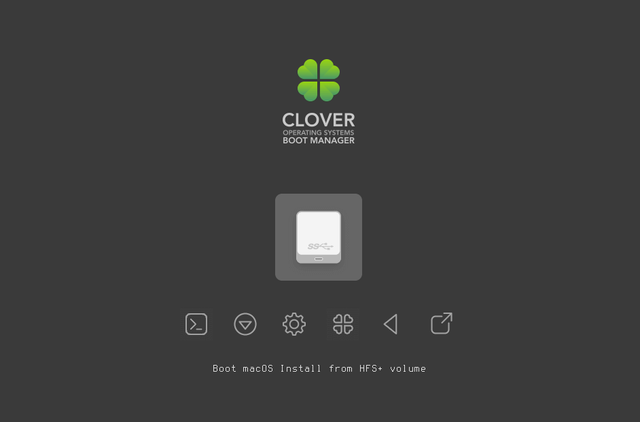
Now start your PC, you should see the Clover boot manager. Select "Boot Install macOS from Install macOS Catalina" or "Boot Install macOS from HFS+ volume
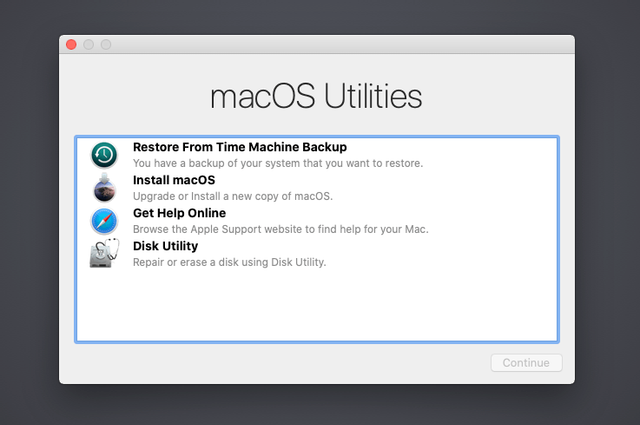
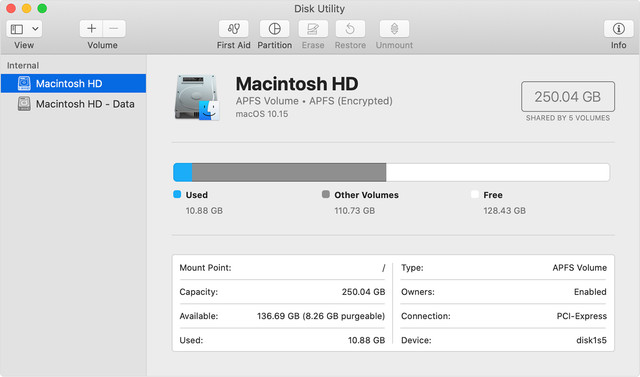
As with Windows, before installing the operating system, you will need to format the drive first. So in the MacOS Utilities menu, go to Disk Utility and then erase the destination disk. Use the Mac OS Extended file system (With Registration).
Now close the disk utility and proceed to install macOS
Follow the instructions on the screen until your hackintosh is restarted. From the Clover menu, select "Boot macOS Install from [your disk]" and continue the installation process until it reboots again. This time, select "Boot macOS from [your disk]" and follow the process.
And your hackintosh is almost ready. However, you still cannot boot up by yourself without the USB drive.
Post Installation
Once macOS is installed, download Clover EFI and install it on your disk using the same settings as we did with the USB drive. This will also create an EFI partition on your disk and automatically mount it (if not, you can use Clover Configurator to mount it).
Delete the EFI folder inside the EFI partition on the disk. Then copy the EFI folder from the USB drive. Your hackintosh should now be able to boot itself without the installation usb! Eject the USB drive and try to reboot it.
- Paste this EFI folder on your participant
- Delete the folder called EFI in the participation that we have mounted (if it exists)
- Download this EFI folder
- We decompress the file
- and copy the EFI folder in our EFI participation
- Reboot or start the computer on which you want to install Catalina with the flash drive connected.
- Boot up from the UEFI part of the pendrive, either by selecting it as a temporary boot device or by setting it as a priority in the BIOS settings.
If you liked it or have questions, please comment below or on our facebook page
All the information provided on this article are for educational purposes only. The author is no way responsible for any misuse of the information, will not be held responsible in the event any criminal charges be brought against any individuals misusing the information in this article to break the law.