Today, we're going to talk about how to implement a simple language selector on the basic static website, without the need of any backend or database calls or redirection to another page. We will be using only JavaScript, no PHP or other programming languages.
Serving HTML content in multiple languages is a big topic. To start with, what we’re going to do is to basically modify HTML classes by JavaScript to change the appearance of specific HTML elements on the page.
For demonstration purposes we chose the simple portfolio website.
Now we show you how to do multiple language versions on a basic website and how to switch content with JavaScript without any backend, with the added benefit of being light and fast. When we select a language in our header element, all the content we have prepared will switch to that language.


Without further redue, let’s go into it.
Prerequisites
Surely to continue, we assume HTML, CSS and JavaScript knowledge might come handy.
Language Selectors in Header
Let's say we have a simple page with header, body etc already done, but we would like to add languages options. First we create three versions of the languages we want to have >
Now we describe what we have done. We created container We also have a lang attribute, which will let search crawlers know that this content is in another language, they will treat that content differently, that is for a better rankings. The most important is attribute id, this serves for the event listener - basically when JavaScript code detects we for example clicked on one of these three, it will run our code. (Note that with and height of the icons in the class Alternatively, we can use downloaded images(icons), these are from flagpedia.net, to be sure that our page won't hang when the external source isn't available. So we made it local like this> Now the coding part. We would need to manipulate the appearance or disappearance of those elements with different texts. To access them, in our JavaScript file we create > The variable hidden and shown will modify the style of the HTML element from this script. Now we need to recognize what we are going to do with it. We need to switch on the one language version and by the same time switch off all the other versions. Until now we have created all the text in HTML and functions to show or hide them, but we also need the switch to launch the functions. We continue behind previous code by adding this> To explain, by adding event listener on the element stored in variable This alone would be enough to have it working, but there is a slight problem, so far we still see all 3 versions by default, only after we click on the respective button, they hide. So we need to make sure by default there is only 1 visible by calling for example Now we will step up and we store the picked language into Local Storage of the user’s browser. This way user will be served the language that was last selected. That means even if the page is refreshed, it will “remember” the last selection. We create an entry to the local storage by using This way we will have stored under id By default - if we couldnt recover anything from Local Storage, e.g. the user is the first time on your site, there will be launched code under The best thing would be let the search engine know that we have localized versions of the text on our page, so they won't treat the translated text as duplicate. Because that can lead to a lot of aplicated content and that can in turn might lead in lower rank in search engines. Surely we can make this better, for example putting all the text content (all the translations as well) into one object and selecting the desired version of the text from it with code that retrieves value from the key, but that we will do in another article. Until then! Images by Tibor Kopca
Next, we have 3 sets of languages, each have class language , again for CSS, the british, spain, slovak classes are for a set of flags we took from Country Flags - A simple API to load any country flags.
CSS for the upper HTML code>
.languageContainer {
display: flex;
justify-content: end;
overflow: visible;
height: 3rem;
font-size: small;
}
.languages {
display:flex;
align-items: center;
margin:.2rem;
padding: 0.5rem;
color: #fff;
cursor: pointer;
}
.languages::before {
content: '';
display: block;
width: 32px;
height: 32px;
}
.british::before{
background:url("https://www.countryflags.io/gb/flat/32.png");
}
.spain::before{
background:url("https://www.countryflags.io/es/flat/32.png");
}
.slovak::before{
background:url("https://www.countryflags.io/sk/flat/32.png");
}
languages::before correlates with the image size we have set in the URL)
(Note2 : we set nice pointer - hand will show when we move mouse cursor above the language class)
.british::before{
background:url('../img/flags/unitedkingdom32x32.png')
}
.spain::before{
background:url('../img/flags/spain32x32.png')
}
.slovak::before{
background:url('../img/flags/slovakia32x32.png')
}
JavaScript part
const selectedEnglish = document.getElementById("eng");
const selectedEspanol = document.getElementById("esp");
const selectedSlovensky = document.getElementById("svk");
const hidden = "display:none;";
const shown = "display:block;";
To access all the elements with the same language, we create this code>
const allEnglishText = document.getElementsByClassName("eng");
const allEspanolText = document.getElementsByClassName("esp");
const allSlovakText = document.getElementsByClassName("svk");
This can be put in the function, and we need to have 3 functions for each language version. For example :
allEnglishText is a collection of all HTML elements with the same class name eng. In the function, we cycle through all such elements and we set parameter, or lets say style to all of them, and similarly, all the other language versions will not be displayed at all.
//SHOW ALL ENGLISH TEXT
function showEnglishText() {
for (element in allEnglishText) {
allEnglishText[element].style = shown;
}
for (element in allEspanolText) {
allEspanolText[element].style = hidden;
}
for (element in allSlovakText) {
allSlovakText[element].style = hidden;
}
}
//SHOW ALL SPANISH TEXT
function showSpanishText() {
for (element in allEnglishText) {
allEnglishText[element].style = hidden;
}
for (element in allEspanolText) {
allEspanolText[element].style = shown;
}
for (element in allSlovakText) {
allSlovakText[element].style = hidden;
}
}
//SHOW ALL SLOVAK TEXT
function showSlovakText() {
for (element in allEnglishText) {
allEnglishText[element].style = hidden;
}
for (element in allEspanolText) {
allEspanolText[element].style = hidden;
}
for (element in allSlovakText) {
allSlovakText[element].style = shown;
}
}
Buttons and EventListeners
//ENGLISH-> ALL OTHERS SWITCHED OFF
selectedEnglish.addEventListener("click", () => {
selectedEnglish.classList.add("langSelected");
selectedEspanol.classList.remove("langSelected");
selectedSlovensky.classList.remove("langSelected");
showEnglishText();
});
selectedEnglish --> that's our element in the header with id=’eng’, when we make mouse click on it, it will launch our function showEnglishText() and also we have bunch of code to add a CSS class to it, which contain border, to show off visually what button is currently clicked.
Of course we need to add all other versions>
//SPANISH-> ALL OTHERS SWITCHED OFF
selectedEspanol.addEventListener("click", () => {
selectedEspanol.classList.add("langSelected");
selectedEnglish.classList.remove("langSelected");
selectedSlovensky.classList.remove("langSelected");
showSpanishText();
});
//SLOVAK-> ALL OTHERS SWITCHED OFF
selectedSlovensky.addEventListener("click", () => {
selectedSlovensky.classList.add("langSelected");
selectedEspanol.classList.remove("langSelected");
selectedEnglish.classList.remove("langSelected");
showSlovakText();
});
showEnglishText() function behind the definition of variables. But we can make it better as we can see in the next chapter.
Mechanism for storing the selected language in Local StoragelocalStorage.setItem() in each of the event listeners, like this>
//ENGLISH-> ALL OTHERS SWITCHED OFF
selectedEnglish.addEventListener("click", () => {
selectedEnglish.classList.add("langSelected");
selectedEspanol.classList.remove("langSelected");
selectedSlovensky.classList.remove("langSelected");
showEnglishText();
localStorage.setItem("languageActive", "english");
});
//SPANISH-> ALL OTHERS SWITCHED OFF
selectedEspanol.addEventListener("click", () => {
selectedEspanol.classList.add("langSelected");
selectedEnglish.classList.remove("langSelected");
selectedSlovensky.classList.remove("langSelected");
showSpanishText();
localStorage.setItem("languageActive", "espanol");
});
//SLOVAK-> ALL OTHERS SWITCHED OFF
selectedSlovensky.addEventListener("click", () => {
selectedSlovensky.classList.add("langSelected");
selectedEspanol.classList.remove("langSelected");
selectedEnglish.classList.remove("langSelected");
showSlovakText();
localStorage.setItem("languageActive", "slovak");
});
languageActive the language version we just clicked on. Now its time to write the code to recover this information from Local Storage. And this is how>
//LOCAL STORAGE ADDON
switch (localStorage.getItem("languageActive")) {
case "english":
selectedEnglish.classList.add("langSelected");
showEnglishText();
break;
case "espanol":
selectedEspanol.classList.add("langSelected");
showSpanishText();
break;
case "slovak":
selectedSlovensky.classList.add("langSelected");
//console.log("slovak on");
showSlovakText();
break;
default:
//default ENGLISH text shown, all others disabled
//default -> no local storage exists
selectedEnglish.classList.add("langSelected");
showEnglishText();
}
default. We chose english to be shown first.
When there is an entry found, switch will recognize the value and it will call the respective function.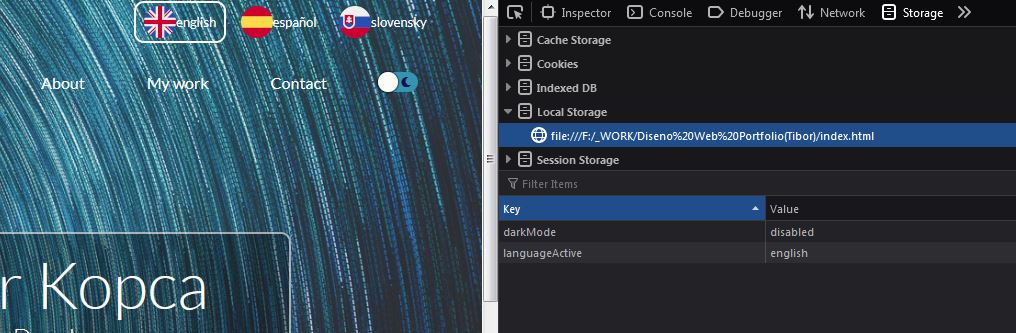

Conclusion
We showed you how to do some very basic language switching and hopefully you liked it.Related Articles