How to Send Email from an HTML Contact Form

Implementing Sendmail and PHPMailer


In today’s article we will write about how to make a working form that upon hitting that submit button will be functional and send the email (to you as a web creator and to the user or customer as well).
If you’re a PHP developer, there's a high probability that you can't avoid having to send or process emails. Functional form on your site is one of the basic needs or standards nowadays. If you don't have a form on your website, you could be missing out on more leads, potential customers or just simply subscribers, with added benefit of security.

Prerequisites


Knowledge of HTML, CSS, JavaScript and it won't hurt if you know a bit of PHP.
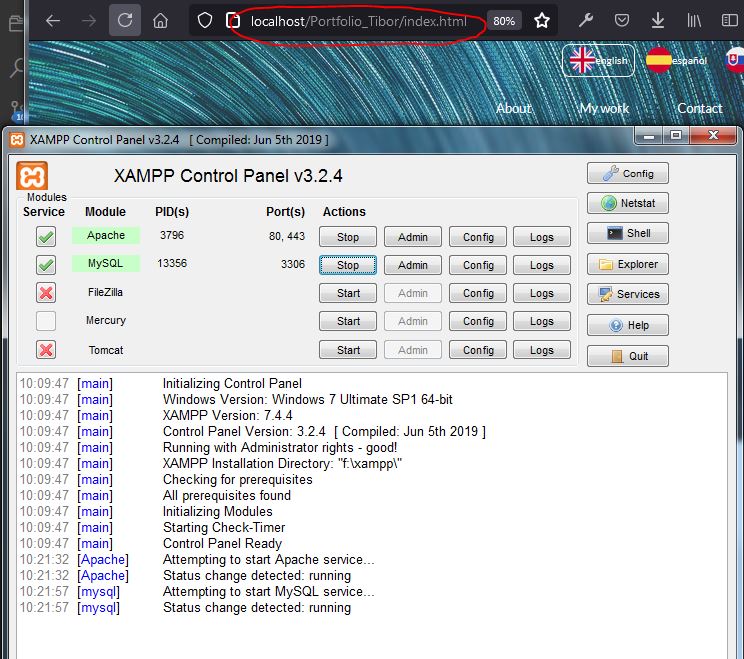
Also for PHP code to work, we will test the functionality on XAMPP, this could be omitted if you would upload the code to the web host upon every change, so the host would be the one running PHP, this way it is possible to work in a kinda ‘live’ environment.
(Note: when we’re running XAMPP, it is run under admin rights, by clicking right mouse and choosing this option.)
We assume that you have an existing Gmail account for the testing of this code, and that you will use Gmail’s SMTP server to transmit email.

Sendmail_xampp


Basic form

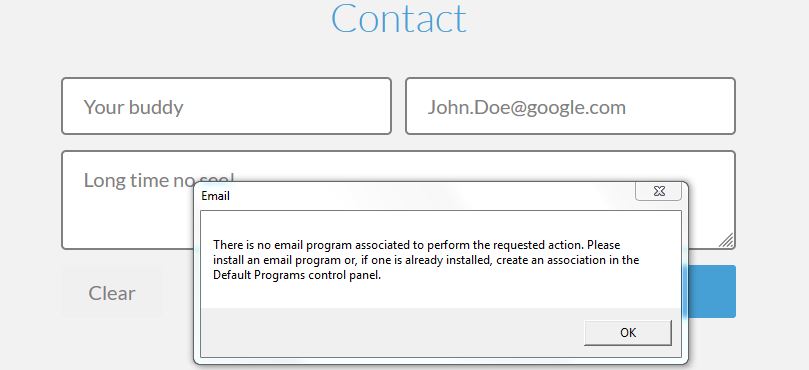
This code will create a really basic form that asks for the contact's name, email, both with a maximum length of 40 characters,  message upto 500 characters, and a submit button. For a more comprehensive one, we'll have to add some more lines of code, but that we will do later.
Also this code is rather non-functional - it doesn't send directly to email address, but it opens an email client window to submit the form, so the input field for email we just asked to be filled by the user is pretty much useless.
(Note: this is similar to HTML <address> Tag with syntax <a href=”mailto:[email protected]”>John Doe</a> )

Sendmail_Plain_html

PHP code - Server Side Handling


So to make the magic happen, we assume that your website will have some working PHP server, even local or live host.

method="POST"
This determines how the form data is submitted to the server, there are two ways to do this, POST or GET. We will use POST so the filled data in form will be sent “behind the scenes” and they won't appear in our URL as they would with GET. So NEVER use GET to send sensitive data as the submitted form data is visible in the URL!
POST has no size limitations, and can be used to send large amounts of data.
accept-charset="utf-8"

Action parameter will determine where the filled data will be sent to, this will be a new file we create in file structure. Choose the name of the file whatever you want, for example subscribersform.php, in our case we will name it sendmail.php.


This could be even the same page we started on - index.html with php code before all the HTML code and renamed to index.php. This would work the same way.
What happens here is by having sendmail.php in the action parameter, after hitting submit, the code will send the form data to sendmail.php where it will be captured.
If we write our code like the one below, it would redirect us to that file - effectively launching another webpage.

<form class="" accept-charset="utf-8" action="sendmail.php" method="POST" enctype="multipart/form-data">
  • application/x-www-form-urlencoded - this is the default value, if the enctype is not specified,
  • multipart/form-data is necessary when your users are required to upload a file through the form.
  • text/plain is a valid option, though not recommended as it sends the data without any encoding at all.


Let’s jump to sendmail.php.
Here we put the PHP code which will handle all the action. Now if you want to try already filling the form and hitting submit, you will discover that suddenly you're stuck in this file, so to return to the main page, we write this part of code, putting it always at the end. Also for test purposes, we also print text to console>

<script>
console.info('virtual email sent from sendmail.php.');
//REDIRECT TO THE MAIN PAGE
window.location.href = './index.html';
</script>

Using Sendmail

It's time to write the code that sends us something. A PHP script starts with <?php and ends with ?> .
So we are in sendmail.php right, and we write>

<?php
if($_POST["message"]) {
    mail("[email protected]", "Test subject line", "fictional email body", "From: [email protected]");
}?>

What does this code mean?
First we check if the message was filled and if it is, the code inside IF will execute, effectively launching mail( ) function. "mail" sends the completed form as an email to "[email protected]," and the subject line is what follows.

With that, we have the really really basic code, without any validation or security checks, surely we can do better than this.

Now remember that we have input HTML elements in our form right? Every one of the fields we want to process, has a parameter name to it and we will work with those in sendmail.php. Data filled by a user will be converted into a variable with that name from which input it came. For this to work, of course the name parameters need to have unique ‘names’, note that we have only one of each - name=”name”, name=”email”, name=”message” , etc.
As we spoke these variables are all packed in a PHP superglobal variable called $_POST . If you add this to the sendmail.php, upon filling the form, you should see the data that are being submitted.

<?php
echo "<pre>";
    print_r($_POST);
echo "</pre>";
?>

Now we set some variables to break out the $_POST to work with the data. Now we have our code like this>

if($_POST["message"]) {
    $name = $_POST["name"];
    $visitorEmail = $_POST["email"];
    $message = $_POST["message"];
    $OUR_MAIL = '[email protected]';
    
$errors = "";
//NORMAL OPERATION - NO ERRORS        
    if(empty($errors)){
        $EMAIL_SUBJECT = "New Form Contact From " . $name . " @ Your Portfolio Website!";
        $emailBody = "User name: " . $name . "rn".
                     "User email: " . $visitorEmail . "rn".
                     "User message: " . $message . "rn";
 
        $TARGET_EMAIL = "[email protected]";
//HEADERS
        $headers = "From: " . $OUR_MAIL . "rn";
        $headers .= "Reply-To: " . $visitorEmail . "rn";
}}
?>

(Note: rn will do the line break - the line structured text)
For now, we don't have any code validation, nor actual mail function, but that is going to change as we show it in the code next. Headers are optional, serve for things like BCC, Reply-To addresses, and things like that.

Mail Function


PHP mail is the built in PHP function that is used to send emails from PHP scripts.

mail($TARGET_EMAIL, $EMAIL_SUBJECT, $emailBody, $headers)
$TARGET_EMAIL is where the message will be sent to.
$OUR_MAIL is the address - email server from where the message will be sent. This is for example a production server where we have hosted our website.


We added resolution of success or failure of the mail function, it will even show the user message according to what is the result. Last thing will be the redirection to the index.html page, effectively refreshing the window.

$success = mail($TARGET_EMAIL, $EMAIL_SUBJECT, $emailBody, $headers);
//SUCCESS OR FAIL FOR CORRECT TEXT
if ($success){
        ?>
      <script language="javascript" type="text/javascript">
      //REDIRECT TO THE MAIN PAGE or alternatively to 'thank you page'
 alert('Thank you for the message. I will be in contact with you shortly.');
       window.location.href = './index.html';
      </script>
      <?php
} else{
      //mail failed for some reason
      ?>
      <script language="javascript" type="text/javascript">
        alert('Message failed. Please, contact me by an alternative way.');
        window.location.href = './index.html';
      </script>
      <?php
}

Sendmail_gmail_inbox

Sendmail_script_thank_you

XAMPP settings


If you for some reason see this message - Failed to connect to mailserver at “localhost”.. , now we will give you some hints on how to resolve this issue.

Sendmail_PHP_Fail

PHP must be configured correctly in the php.ini file with the details of how your system sends email.
Open php.ini file in XAMPP directory and find the section headed [mail function].


Windows users should ensure that the directive called SMTP that defines your email server address is set to the SMTP = smtp.gmail.com . The second is called sendmail_from which defines your own email address, so that one you need to set to the gmail address EXACTLY like we have $OUR_MAIL variable.


Another important thing is to configure sendmail.ini for email notifications. In PHP.ini locate sendmail_path and replace it with sendmail_path = ""C:xamppsendmailsendmail.exe" -t" . Obviously the drive and path must be pointing to the sendmail.exe, be sure it is.

Sendmail_PHP_ini

Edit the sendmail.ini file in the sendmail subdirectory of your XAMPP installation directory. Inside this file, find the [sendmail] section and replace these lines. The values should be like this>
Smtp_server = smtp.gmail.com
Smtp_port = 465
Smtp_ssl = auto
Error_logfile = error.log
Auth_username = [email protected]
Auth_password = gmail password

After this, restart the Apache server using the XAMPP control panel.


Gmail Email Client

Also as the last advice, using Gmail SMTP server for sending emails works only if you have allowed less secure apps  to access your account(If you don't use 2-Step Verification).
And in settings enable IMAP access.
Sendmail_Google_less_secured_settings

Validate Form Data With PHP

Were almost at the end. The thing is, we might be victims of some malevolence everytime we put any form out there, we might have to have more security set up. Lets focus on the back-end, about how to validate HTML forms we wrote in the other article, there you can get information on how to do the Javascript front-end code.

So we modify yet again our code. Remember we have our code checking for errors but they haven't been captured yet. Now only when no errors exist the code will proceed to mail() function.

//EMPTY SPACE VALIDATION
    if(empty($name) || empty($visitorEmail) || empty($message)){
        $errors .= "n All fields are required";
    }
 
    //NAME VALIDATION
    $string_exp = "/^[A-Za-z .'-]+$/";
    if (!preg_match($string_exp, $name)) {
        $error_message .= "n The Name you entered does not appear to be valid.";
    }
 
    //EMAIL REGEX VALIDATION
    $email_exp = "/^[_a-z0-9-]+(.[_a-z0-9-]+)*@[a-z0-9-]+(.[a-z0-9-]+)*(.[a-z]{2,3})$/i";
    if (!preg_match($email_exp, $visitorEmail)){
        $errors .= "n Invalid email address";
    }

Sendmail_Pig_user

Good, so far we have validation IF the user submitted the form, and we have validation if there are missing fields or data we don't want. Next we need to get rid of potencial exploits from cross-site scripting(XSS), we must prevent attackers from injecting client-side script into our code.

  • Strip unnecessary characters (extra space, tab, newline) from the user input data (with the PHP trim() function), we also get rid of HTML tags in this one step.
  • Remove backslashes () from the user input data (with the PHP stripslashes() function)
  • By using the htmlspecialchars() this function will convert the special characters into entities to prevent browsers from using it as an HTML elements. This is useful to prevent code from running when we want to do so, for example if the user tries to submit or run his code put in the text field. This doesn't delete the characters, but they won't be handled as HTML code anymore, but as plain text.
    <script>location.href('http://www.facebook.com')</script>
    will become:  
    &lt;script&gt;location.href('http://www.facebook.com')&lt;/script&gt;
     .
  • Lastly we defined a function to replace the empty character of all the unnecessary text we don't want to appear in our mailbox, note that we moved all the text to lowercase for this.

Now, we can check all the incoming data (all our form fields) which we are writing to variables with the test_input() function, and with the function we will strip the data from potentially harming hacker attempts.

//TEST INPUT DATA FOR INJECTION
function testInputData($data){
  $data = strip_tags(trim($data));    //trim extra space, tab, newline from the user input data
  $data = stripslashes($data);        //Remove backslashes () from the user input data
  $data = htmlspecialchars($data);    //data would be saved as HTML escaped code, so safe to display
  $data = preg_replace("([rn])", "", $data); //removes newlines
  $data = cleanString(strtolower($data));      //removing unwanted strings
return $data;
}
 
//Returns empty if encounters any unwanted characters in $inputString
function cleanString($inputString){
  $unwantedChars = array("content-type", "bcc:", "to:", "cc:", "href", "https");
  return str_replace($unwantedChars, "", $inputString);
}
//SEND MAIL CODE
    $name = testInputData($_POST["name"]);
    $visitorEmail = testInputData($_POST["email"]);
    $message = testInputData($_POST["message"]);

PHPMailer


Lets talk about why PHPMailer is better than native PHP mail.


PHPMailer is perhaps the most popular open-source PHP library for sending emails and since its release it has become a PHP developer’s favorite. It is an alternative to PHP mail() function, but with more flexibility for your needs. For instance PHPMailer is object oriented, it can use a non-local mail SMTP server, which is better than mail()s local mail server, it can print error messages when email sending fails. And is also used by popular PHP CMS (content management systems) like WordPress, Drupal, and Joomla.

So we need to go to PHPMailer Github repository and download it as a zip file.
Extract and put files from the src directory of the archive to our application directory to the ‘mail’ folder.

Sendmail_PHPMailer_files
To illustrate how it can be used with our Gmail account, we create totally different script named sendmailphpmailer.php, link it in the index.html instead of sendmail.php and we add this code inside>

<?php
use PHPMailerPHPMailerPHPMailer;
use PHPMailerPHPMailerException;
 
require $_SERVER['DOCUMENT_ROOT'] . '/Portfolio_Tibor/mail/Exception.php';
require $_SERVER['DOCUMENT_ROOT'] . '/Portfolio_Tibor/mail/PHPMailer.php';
require $_SERVER['DOCUMENT_ROOT'] . '/Portfolio_Tibor/mail/SMTP.php';
 
//TEST INPUT DATA FOR INJECTION
function testInputData($data){
    $data = strip_tags(trim($data));
//trim extra space, tab, newline from the user input data
    $data = stripslashes($data);
//Remove backslashes () from the user input data
    $data = htmlspecialchars($data);                    
//data would be saved as HTML escaped code, so safe to display
    $data = preg_replace("([rn])", "", $data);        
//removes newlines
    $data = cleanString(strtolower($data));             
//removing unwanted strings
    return $data;
}
//Returns empty if encounters any unwanted characters in $inputString
function cleanString($inputString){
    $unwantedChars = array("content-type", "bcc:", "to:", "cc:", "href", "https");
    return str_replace($unwantedChars, "", $inputString);
}
 
//_POST VALUES
$name = testInputData($_POST["name"]);
$visitorEmail = testInputData($_POST["email"]);
$message = testInputData($_POST["message"]);
 
$errors = '';
//EMPTY SPACE VALIDATION
if(empty($name) || empty($visitorEmail) || empty($message)){
    $errors .= "n All fields are required.";
}
 
//NAME VALIDATION
$string_exp = "/^[A-Za-z0-9 .'-]+$/";
if (!preg_match($string_exp, $name)) {
    $errors .= "n The Name you entered does not appear to be valid.";
}
 
//EMAIL REGEX VALIDATION
$email_exp = "/^[A-Za-z0-9._%-]+@[A-Za-z0-9.-]+.[A-Za-z]{2,4}$/";
$email_exp2 = "/^[_a-z0-9-]+(.[_a-z0-9-]+)*@[a-z0-9-]+(.[a-z0-9-]+)*(.[a-z]{2,3})$/i";
if (!preg_match($email_exp2, $visitorEmail)){
    $errors .= "n Invalid email address.";
}
 
//PHPMailer Object
$mail = new PHPMailer(true);                                                        //Argument true in constructor enables exceptions
 
//SERVER SETTINGS
$mail->isSMTP();
//Send using SMTP
$mail->SMTPDebug  = 0;
//0 = off(for production use)/1 = client messages/2 = client and server messages
$mail->Host       = 'smtp.gmail.com';                       
//Set the SMTP server to send through
//$mail->Host = gethostbyname('smtp.gmail.com');              
//if your network does not support SMTP over IPv6
$mail->SMTPSecure = 'tls';                                  
// ssl is deprecated
$mail->SMTPAuth   = true;                                   
//Enable SMTP authentication
$mail->SMTPSecure = PHPMailer::ENCRYPTION_STARTTLS;         
//Enable TLS encryption; `PHPMailer::ENCRYPTION_SMTPS` encouraged
$mail->Port       = 587;                                    
//TCP port to connect to, use 465 for `PHPMailer::ENCRYPTION_SMTPS` above
$mail->SMTPOptions = array(
    'ssl' => array(
    'verify_peer' => false,
    'verify_peer_name' => false,
    'allow_self_signed' => true
    )
);
 
//AUTHENTIFICATION
$mail->Username   = '[email protected]';     //SMTP username
$mail->Password   = 'websiteGmailAccountPassword';           //SMTP password
 
//RECIPIENTS
$mail->setFrom('[email protected]', 'Tibor Kopca Portfolio');        
//From email and name
$mail->addAddress("[email protected]", "Recipient : Tibor Kopca");           
//To address and name
$mail->addReplyTo($visitorEmail, "Reply to " . $name );                          
//Address to which recipient will reply
 
//CC and BCC
//$mail->addCC("[email protected]");
$mail->addCC($visitorEmail, $name);                      
//carbon copy to visitor email address
$mail->addBCC('[email protected]');
 
//CONTENT
$mail->isHTML(false);                                                              
//Send HTML or Plain Text email
$mail->Subject = "New Form Contact From " . $name . " @ Your Portfolio Website!";
$mail->AltBody = "This is the plain text version of the email content";    
// If html emails is not supported by the receiver, show this body
$mail->msgHTML("<h2>Thank you for the message. We will contact you shortly.</h2> <br>" .
                "<h3>User name: " . $name . " <br>" .
                "User email: " . $visitorEmail . "<br>" .
                "User message: " . $message . "<h3>" );
 
//ERROR HANDLING AND SEND MAIL
if ($errors) {
//error messages exists - the message shouldnt be send
    echo "Mailer Error: " . $errors;
}else{
    try {
        $mail->send();
        ?>
        <script language="javascript" type="text/javascript">
            alert('Thank you for the message. We will contact you shortly.');
            window.location.href = './index.php?action=message_sent#contact';
        </script>
        <?php
    } catch (Exception $e) {
        echo "Message could not be sent. Mailer Error: " . $mail->ErrorInfo; //can return error messages in 43 different languages.
        ?>
        <script language="javascript" type="text/javascript">
            alert('Message failed. Please, contact me by an alternative way.');
            window.location.href = './index.php?action=message_failed#contact';
            </script>
        <?php
    }
}
?>

Sendmail_PHPMailer_form

Sendmail_PHPMailer_gmail

Note2: at the end we modified the redirection to our index.html with some extra code to pass the content we want in the URL. This way we can catch that content in the page we are going to be redirected. For this to work, we renamed index.html to index.php and we added this code where the HTML form element is. Basically when the message runs successfully, form won't appear again but the message we coded instead.

<div class="container">
   <?php
   $action = isset($_GET['action']) ? $_GET['action'] : "";
   switch ($action) {
       case "message_sent":
           ?><h3>Thank you for the message, I will respond ASAP.</h3><?php
             break;
     case "message_failed":
           ?><h3>Message failed. Please, contact me by an alternative way.</h3><?php
           break;
        default:
          ?><form class="formular" accept-charset="utf-8" action="sendmailPHPMailer.php" method="POST" enctype="multipart/form-data">
          <input type="text" name="name" placeholder="name" maxlength="40" required>
          <input type="email" name="email" placeholder="email" maxlength="40" required>
          <textarea name="message" id="" maxlength="500" name="message" placeholder="message"></textarea>
          <input type="reset" class="button" value="Clear">
          <input type="submit" class="button" value="Send">
          </form>
   <?php } ?>
</div>

And this will be the result when all would run correctly.

Sendmail_thankyou

JavaScript Form Validation


We advise you to also add frontend form validation, because in this article we did not show any. If you want to know how it could be made, that we covered in our other article.

Conclusion


And that’s it! We covered PHP built in mail() function and PHPMailer library as an alternative.
To this subject there is much more to be learned but hopefully in this tutorial we provided the basics of sending emails from your website form.
Next time we’d write about how to implement Whatsapp messenger to our website, so stay tuned.

Main Image by M. H. from Pixabay,
Images and editing by Tibor Kopca

 
by Date: 10-05-2021 PHP JavaScript programming sendmail PHPMailer web development hits : 8676  


Related Posts

Examine the 10 key PHP functions I use frequently

PHP never ceases to surprise me with its built-in capabilities. These are a few of the functions I find most fascinating.   1. Levenshtein This function uses the Levenshtein algorithm to calculate the…

How to upload files to the server using JavaScript

In this tutorial we are going to see how you can upload files to a server using Node.js using JavaScript, which is very common. For example, you might want to…

How to combine multiple objects in JavaScript

In JavaScript you can merge multiple objects in a variety of ways. The most commonly used methods are the spread operator ... and the Object.assign() function.   How to copy objects with…

How to Track Flight Status in real-time using the Flight Tracker API

The Flight Tracker API provides developers with the ability to access real-time flight status, which is extremely useful for integrating historical tracking or live queries of air traffic into your…

The Payment Request API: Revolutionizing Online Payments (Part 2)

In the first part of this series, we explored the fundamentals of the Payment Request API and how it simplifies the payment experience. Now, let's delve deeper into advanced features…

The Payment Request API: Revolutionizing Online Payments (Part 1)

The Payment Request API has emerged as the new standard for online payments, transforming the way transactions are conducted on the internet. In this two-part series, we will delve into…

Let's create a Color Picker from scratch with HTML5 Canvas, Javascript and CSS3

HTML5 Canvas is a technology that allows developers to generate real-time graphics and animations using JavaScript. It provides a blank canvas on which graphical elements, such as lines, shapes, images…

How do you stop JavaScript execution for a while: sleep()

A sleep()function is a function that allows you to stop the execution of code for a certain amount of time. Using a function similar to this can be interesting for…

Mastering array sorting in JavaScript: a guide to the sort() function

In this article, I will explain the usage and potential of the sort() function in JavaScript.   What does the sort() function do?   The sort() function allows you to sort the elements of…

Infinite scrolling with native JavaScript using the Fetch API

I have long wanted to talk about how infinite scroll functionality can be implemented in a list of items that might be on any Web page. Infinite scroll is a technique…

Sorting elements with SortableJS and storing them in localStorage

SortableJS is a JavaScript extension that you will be able to use in your developments to offer your users the possibility to drag and drop elements in order to change…

What is a JWT token and how does it work?

JWT tokens are a standard used to create application access tokens, enabling user authentication in web applications. Specifically, it follows the RFC 7519 standard. What is a JWT token A JWT token…

Clicky