
About MySQL replication
MySQL replication is a process that allows you to easily maintain multiple copies of a MySQL data by having them copied automatically from a master to a slave database. This can helpful for many reasons including facilating a backup for the data,a way to analyze it without using the main database, or simply as a means to scale out.
This tutorial will cover a very simple example of mysql replication—one master will send information to a single slave. For the process to work you will need two IP addresses: one of the master server and and one of the slave.
This tutorial will use the following IP addresses:
12.34.56.789- Master Database
12.23.34.456- Slave Database
Setup
This article assumes that you have user with sudo privileges and have MySQL installed. If you do not have mysql, you can install it with this command:
sudo apt-get install mysql-server mysql-client
Step One—Configure the Master Database
Open up the mysql configuration file on the master server.
sudo nano /etc/mysql/my.cnf
Once inside that file, we need to make a few changes.
The first step is to find the section that looks like this, binding the server to the local host:
bind-address = 127.0.0.1
Replace the standard IP address with the IP address of server.
bind-address = 12.34.56.789
The next configuration change refers to the server-id, located in the [mysqld] section. You can choose any number for this spot (it may just be easier to start with 1), but the number must be unique and cannot match any other server-id in your replication group. I’m going to go ahead and call this one 1. Make sure this line is uncommented.
server-id = 1
Move on to the log_bin line. This is where the real details of the replication are kept. The slave is going to copy all of the changes that are registered in the log. For this step we simply need to uncomment the line that refers to log_bin:
log_bin = /var/log/mysql/mysql-bin.log
Finally, we need to designate the database that will be replicated on the slave server. You can include more than one database by repeating this line for all of the databases you will need.
binlog_do_db = newdatabase
After you make all of the changes, go ahead and save and exit out of the configuration file.
Refresh MySQL.
sudo service mysql restart
The next steps will take place in the MySQL shell, itself.
Open up the MySQL shell.
mysql -u root -p
We need to grant privileges to the slave. You can use this line to name your slave and set up their password. The command should be in this format:
GRANT REPLICATION SLAVE ON *.* TO 'slave_user'@'%' IDENTIFIED BY 'password';
Follow up with:
FLUSH PRIVILEGES;
The next part is a bit finicky. To accomplish the task you will need to open a new window or tab in addition to the one that you are already using a few steps down the line.
In your current tab switch to “newdatabase”.
USE newdatabase;Following that, lock the database to prevent any new changes:
FLUSH TABLES WITH READ LOCK;
Then type in:
SHOW MASTER STATUS;
You will see a table that should look something like this:
mysql> SHOW MASTER STATUS;
+------------------+----------+--------------+------------------+
| File             | Position | Binlog_Do_DB | Binlog_Ignore_DB |
+------------------+----------+--------------+------------------+
| mysql-bin.000001 |      107 | newdatabase  |                  |
+------------------+----------+--------------+------------------+
1 row in set (0.00 sec)
This is the position from which the slave database will start replicating. Record these numbers, they will come in useful later.
If you make any new changes in the same window, the database will automatically unlock. For this reason, you should open the new tab or window and continue with the next steps there.
Proceeding the with the database still locked, export your database using mysqldump in the new window (make sure you are typing this command in the bash shell, not in MySQL).
mysqldump -u root -p --opt newdatabase > newdatabase.sql
Now, returning to your your original window, unlock the databases (making them writeable again). Finish up by exiting the shell.
UNLOCK TABLES;
QUIT;
Now you are all done with the configuration of the the master database.
Step Two—Configure the Slave Database
Once you have configured the master database. You can put it aside for a while, and we will now begin to configure the slave database.
Log into your slave server, open up the MySQL shell and create the new database that you will be replicating from the master (then exit):
CREATE DATABASE newdatabase;
EXIT;
Import the database that you previously exported from the master database.
mysql -u root -p newdatabase < /path/to/newdatabase.sql
Now we need to configure the slave configuration in the same way as we did the master:
sudo nano /etc/mysql/my.cnf
We have to make sure that we have a few things set up in this configuration. The first is the server-id. This number, as mentioned before needs to be unique. Since it is set on the default (still 1), be sure to change it’s something different.
server-id = 2
Following that, make sure that your have the following three criteria appropriately filled out:
relay-log = /var/log/mysql/mysql-relay-bin.log
log_bin = /var/log/mysql/mysql-bin.log
binlog_do_db = newdatabaseYou will need to add in the relay-log line: it is not there by default.
Once you have made all of the necessary changes, save and exit out of the slave configuration file.
Restart MySQL once again:
sudo service mysql restart
The next step is to enable the replication from within the MySQL shell.
Open up the the MySQL shell once again and type in the following details, replacing the values to match your information:
CHANGE MASTER TO MASTER_HOST='12.34.56.789',MASTER_USER='slave_user', MASTER_PASSWORD='password', MASTER_LOG_FILE='mysql-bin.000001', MASTER_LOG_POS= 107;This command accomplishes several things at the same time:
- It designates the current server as the slave of our master server.
- It provides the server the correct login credentials
- Last of all, it lets the slave server know where to start replicating from; the master log file and log position come from the numbers we wrote down previously.
With that—you have configured a master and slave server. Activate the slave server:
START SLAVE;
You be able to see the details of the slave replication by typing in this command. The \G rearranges the text to make it more readable.
SHOW SLAVE STATUS\G
If there is an issue in connecting, you can try starting slave with a command to skip over it:
SET GLOBAL SQL_SLAVE_SKIP_COUNTER = 1; SLAVE START;
All done.
See More
MySQL replication has a lot different options, and this was just a brief overview.
Janeth Kent
Licenciada en Bellas Artes y programadora por pasión. Cuando tengo un rato retoco fotos, edito vídeos y diseño cosas. El resto del tiempo escribo en MA-NO WEB DESIGN AND DEVELOPMENT.
Related Posts

How to fix excessive MySQL CPU usage
What happens if we realise that a series of databases that we thought were optimised through the use of indexes, have begun to consume CPU usage time of a server…
How to connect to MySQL with Node.js
Let's see how you can connect to a MySQL database using Node.js, the popular JavaScript runtime environment. Before we start, it is important to note that you must have Node.js installed…

htaccess Rules to Help Protect from SQL Injections and XSS
This list of rules by no means is a sure bet to secure your web services, but it will help in preventing script-kiddings from doing some basic browsing around. MySQL injection…

MySQL 8.0 is now fully supported in PHP 7.4
MySQL and PHP is a love story that started long time ago. However the love story with MySQL 8.0 was a bit slower to start… but don’t worry it rules…
MYSQL: How to create a new user and give it full access only to 1 database
To create a new user in MySQL and give it full access only to 1 database, say dbTest, these are the MySQL commands to do that To create the user: CREATE USER…
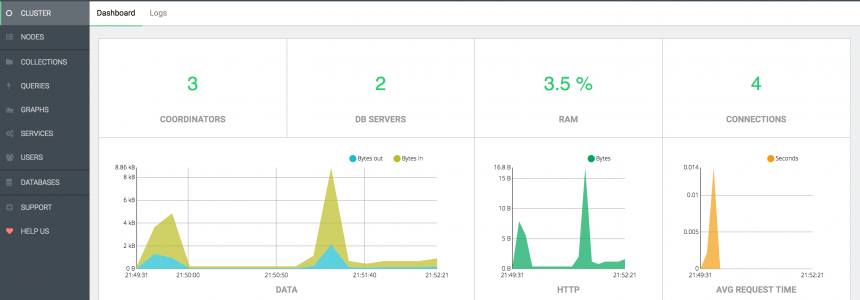
ArangoDB, install and configure the popular Database in ubuntu 16.04
Introduction to ArangoDb, open source, NoSQL, multi-model database BigData seems to be getting stronger every day and more and more NoSQL databases are coming out to the market, all trying to position…
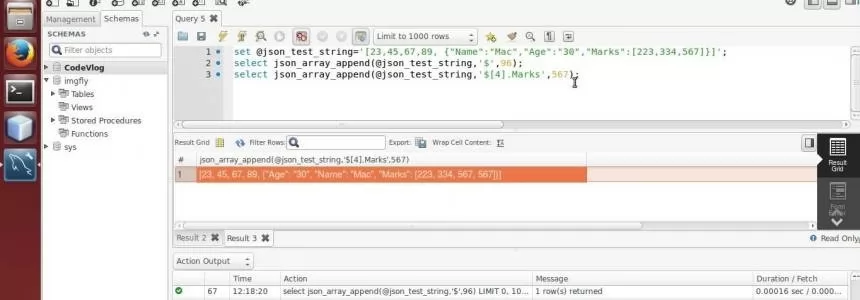
How JSON data types work in mysql
First introduced in MySQL 5.7.8, the JSON data type is a specialized binary column type, similar to a blob , but with added machinery to optimize the storage and retrieval…

How to Disable Strict SQL Mode in MySQL 5.7 and Ubuntu 16.04
If your app was written for older versions of MySQL and is not compatible with strict SQL mode in MySQL 5.7, you can disable strict SQL mode. For example, apps…

MySql: How to build a performant search engine
In content-heavy websites, it becomes increasingly important to provide capable search possibilities to help your users find exactly what they’re looking for. The most obvious solution is searching your MySQL…
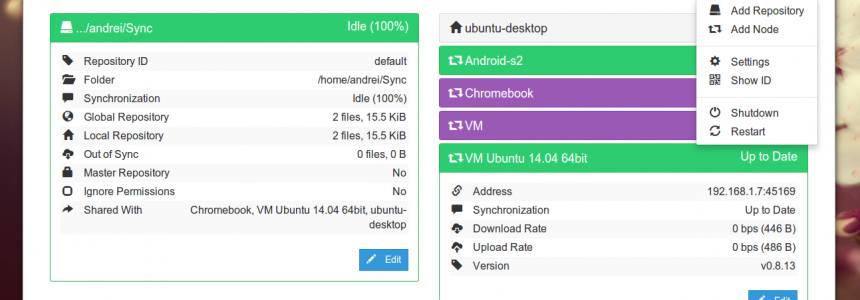
Install Syncthing on Ubuntu 16.04 using Debian Repository
Syncthing is a free continuous file synchronization tool that lets you synchronize your files across desktops, tablets, servers. It’s an open source alternative to the popular BitTorrent Sync (aka btsync)…

Install HHVM + Nginx on Ubuntu 14.04
The LEMHH software stack is a group of software that can be used to serve dynamic web pages and web applications. This is an acronym that describes a Linux operating…
Optimize MySql On Low Memory Servers
Cloud computing makes it very affordable to get your own private virtual server on the Internet. Digital Ocean offers an entry level droplet for USD$5 per month, and Amazon.com has…